I encourage you experiment with various techniques in creating your digital art. This includes exploring some of the various different software tools available to you. It is totally okay to experiment. Try new things. Go beyond just “photography” and see what you can create.
In this image, I used a mix of Adobe Photoshop, along with software from Topaz Labs (I used Topaz Glow and Topaz Impression) to create something completely abstract. Granted, since it is “art”, you may or may not like it. Each person’s artistic expression varies greatly, as does each person’s appreciation of art. I was just playing around, in creating this.
In creating this, I started out with the image below. She’s totally lovely in just a regular photograph. I just felt like experimenting to see how much I could transform this image into something totally abstract.
Or in this image, I started with an image originally shot at a very slow shutter speed, intentionally adding motion blur, and then applied some color enhancements with Adobe Photoshop, followed by a few tweaks with Topaz Glow.
Or in the following image, I did NOT use any software manipulations to create this. This was 100% created with camera techniques using a super slow shutters speed and “painting light” into the background.
Experiment. Have fun. The bottom line is: If you are not having fun, you are not doing it right.
If you own more than one lens, be careful when you switch to the other lens! Try to work quickly. The longer you have your lens off your camera, the more time there is for dust to drift into the camera body, and that dust eventually can work its way onto the sensor. Sensor dust then becomes visible in your images!
If at all possible, keep your camera pointed downward as you change lenses, so gravity is at least working in your favor, pulling dust away from your camera. Also shield your camera from wind if you absolutely have to change lenses on a windy day. Watch out, though. Just shielding your camera from the wind doesn’t magically mean the air is clean and dust free.
The absolute worst place to change lenses is at the beach. That sandy salty humid air is just bound to get junk inside your camera and eventually onto your sensor. I would say avoid doing that at all costs.
I’ve seen some people claim that it is important to turn off your camera before you change lenses. I have checked with numerous experts who all say it is NOT an issue to worry about. You don’t have to turn off your camera to change lenses. If you have any concerns about your specific camera, check your user manual. I don’t think it’s a problem, though, at least from what I have been told.
Oh another point. If you ever sit the camera or lens on the ground, you’ll get dirt and dust on the bottom of the camera or lens, making it even more likely to get dust inside your camera and eventually on the sensor. You’re better off sitting the camera on a table, a bench, a chair, concrete, a rock, anything but on dirt!
And for the lens you put away in your camera bag, make sure you put a CAP on the back! Never just put a lens in your camera bag without a cap on the back camera mount. That will just get dust inside the lens and the next time you mount that lens on a camera, you’ll just transfer the dust into your camera!
What does sensor dust do to an image? I shows up in your photographs as little dark spots, sometimes very tiny, sometimes fairly big. How crisp and well-defined the spots are depends on what aperture you are using. The higher the f/stop, the more well-defined the sensor dust appears to be. At lower f/stops, the dust is more soft.
Here’s a waterfall photo that has sensor dust on it.
I have circled some of the sensor dust I noticed. And here is an enlarged section so you can see it more clearly.
THAT is what you are trying to avoid by exercising care when changing lenses!
Eventually the sensor dust becomes enough of a problem that you will have to get your sensor cleaned. You could take your camera to a local camera store, or send it off to your camera manufacturer for cleaning. You can also buy special swabs and other tools for cleaning the sensor yourself. Exercise caution when doing that. You really need to research that carefully to ensure you don’t damage your camera. I am not saying you shouldn’t clean your own sensor. I do it all the time. Just make sure you know what you are doing before you try it!
At least do what you can by reducing the dust that gets into your camera in the first place. Start by practicing good lens-changing habits.
This nifty device, called a “LensPen” is a wonderful device for keeping your lens clean! I always have one in my camera bag.
One end has a retractable brush and the other end is a felt tip with a protective cap. It has a special cleaning compound that does an excellent job of cleaning the front of your lens. Keeping your lens clean is important, especially when you shoot toward the sun. Dust, dirt, and smudges really can harm the quality of your photographs.
With a few Photoshop edits, you can alter the appearance of an image, changing the color, brightness, as needed. I just wanted to mention that, just in case you hadn’t thought of that!
For this image, it was originally shot against a green backdrop.
For this quick example, I intentionally did not do any super dramatic changes, like totally substituting a different background. These are just some super quick edits all made within about 3 minutes max.
Here are the steps I used in Photoshop:
(You’ll have to know a bit of Photoshop terminology for this to really make sense. 🙂 )
I used the menu item Image -> Adjustments -> Replace Color command. Then after I used the eyedropper to select the green background I simply shifted the Hue and Luminance sliders until I achieved the color I wanted.
I just did a few quick edits to remove one of the catch lights in her eyes using the Brush tool, and then some quick Clone Stamp edits to clean up a few hairs, followed by a tiny amount of small cleanup of very minor blemishes using the Healing Brush (her skin is amazing anyway though!).
Finally I created an Adjustment Layer (choose any type, really) and change its Blend Mode to Multiply. Then I used a black brush on the Layer Mask to removed the effect of that layer mostly in around the top half of her body to provide a nice vignette. That’s all!
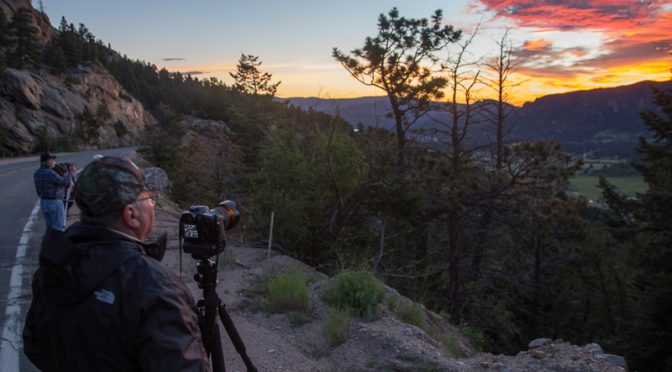
I love landscape and nature photography! Beyond mastery of your camera settings such as exposure modes, aperture, depth of field, shutter speeds, ISO, focal lengths, etc. there are three primary factors that will impact your landscape and nature photographs:
Location – Seek out locations that will potentially yield great results for nature and landscape photographs. Do your research! There are tons of resources online to give you good suggestions on locations, national and state parks, etc. for great photographs. Participating in a destination photography workshop is another great way to learn about the right locations to visit, at the right times of day. Plus, if you are looking for wildlife, you really need to do research on the best places to find the wildlife. Ask the locals! Ask park rangers!
Timing – Your choice of time of year and time of day has a huge impact on your nature and landscape photographs. You can’t really modify the light on a mountain to make it look perfect. All you can do is plan to be at the right spot at the right time, with the greatest possibility of having great light. That might mean showing up very early in the morning or late in the day, or that might mean coming back at a different time of the year. There is a great app for planning the timing for the best light in any location. It is called The Photographer’s Ephemeris. It’s pretty cool. You can use their app to put a “pin” on a map and then have it show you exactly the sun and moon light angles and exact location of sunrise/sunset and moonrise/moonset and the timing for all that. You can use the app to precisely plan the best day and time and location for your perfect sunrise or sunset.
Luck – Despite all your planning, part of this boils down to just pure luck. You can choose the perfect location and the perfect time, but you can’t choose what the weather and atmospheric conditions will be at that time. And if you are looking for wildlife, you can’t be sure the wildlife will actually be there, even if the local people all say that is the perfect spot for viewing wildlife. You an get up early to photograph a sunrise, but you won’t really know for sure if the sunrise will be spectacular or covered up by a cloud bank. Ultimately there is a certain amount of luck involved in being at the right place at the right time. All you can do is try to place yourself in the optimal locations at the right times to increase your chances of success.
Here are a few photos along with some other tips:
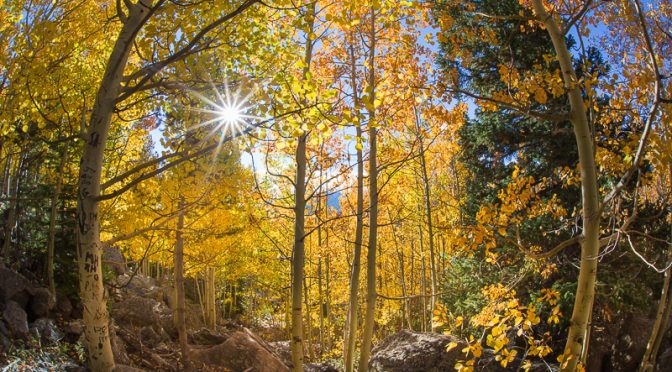
Choose the right time of year for fall colors.
Sometimes converting an image to black & white can make the scene even more dramatic. Try to have a foreground with leading lines that draw your eyes deeper into the photograph.
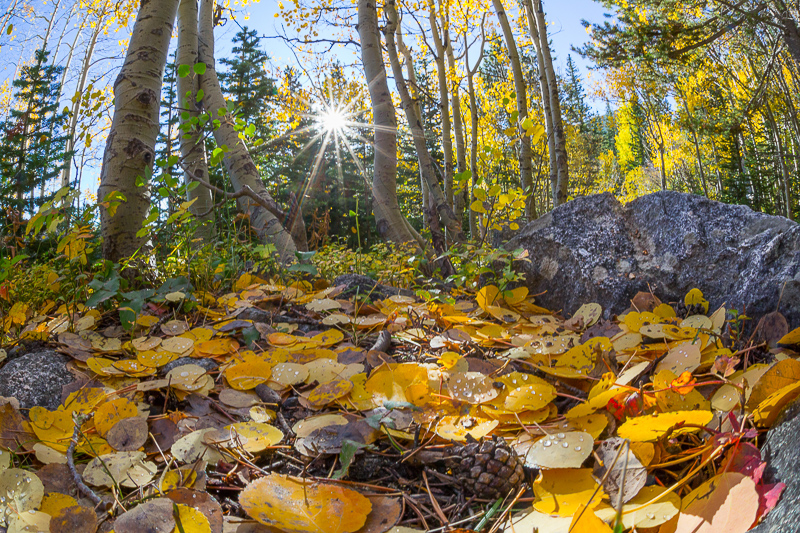
Try to place something in the foreground, to add more interest to the shot.
Use “framing” to have elements in the foreground naturally frame a key subject in a landscape.
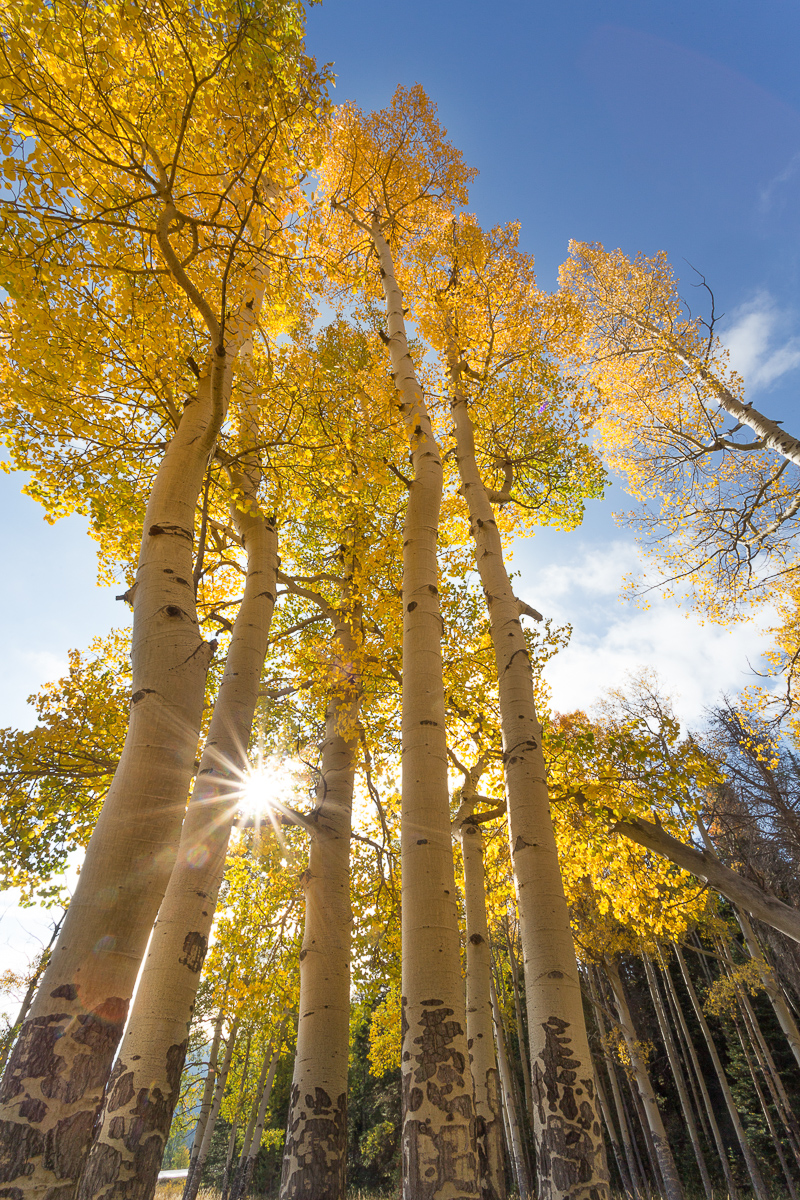
Shoot upwards sometimes. Use wide angle lenses to take in a wider view of a scene. Shoot at a really high f/stop (like f/22 in this shot) to create that starburst effect.
Reflections create nice symmetry.
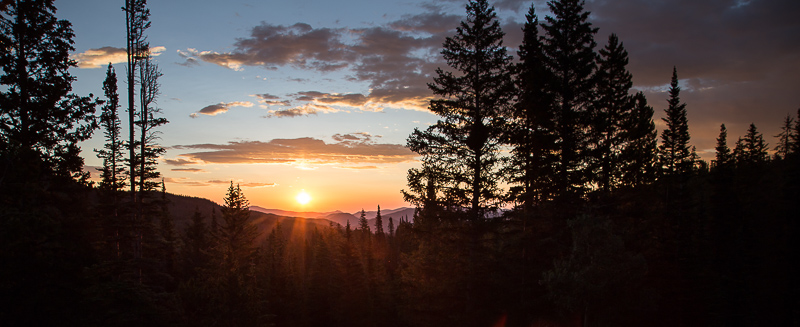
Sunrises are always a gamble. Don’t let the prospects of a cloudy morning scare you away. You actually want clouds in the shot. A sunrise can turn out to be pretty boring if there isn’t a cloud in the sky.
If you want to capture soft flowing waterfalls, use a slower shutter speed.
Be ready to capture an unexpected moment with wildlife.
Ultra-wide angle lenses are always handy for some wide scenic vistas our mountain ranges. When shooting lakes, try to feature the reflections in the water.
Bad weather can be dangerous, but don’t put away your camera!
Early morning light on mountains provides such a beautiful enhancement to any mountain shot.
If the atmospheric conditions are creating beautiful clouds, make sure you feature the clouds in some of your photos.
Enjoy and Appreciate
One of the things I love the most about nature and landscape photography isn’t even the photography itself. It is the fact that it is a wonderful excuse to just be out there in the midst of this beautiful and amazing world.
Generally speaking, you want to shoot at the lowest ISO you CAN for any given shot. That does not mean you should never shoot at high ISO values though. Just only do that when you really need to.
When do you need to shoot at higher ISO values? Really there is only one main reason, and that is to get to higher shutter speed values. Sometimes you might need to go to higher shutter speed values just to ensure you eliminate any negative effects due to hand movement/vibration when hand-holding your camera. And the other reason for higher shutter speeds is to freeze movement of elements within the photograph, like a subject that is moving.
If you are finding your shutter speeds aren’t fast enough, then you only have three options really. Increase the light, open up the aperture more, or increase the ISO. If you can’t increase the light, then that narrows down the options. If you open up the aperture, that will allow you to shoot at faster shutter speeds but that also affects the depth of field. If that is permissible, then opt for that solution first. But then if that still doesn’t get your shutter speeds in the range you are needing, it is time to bump up the ISO. Many of the latest generation cameras go to very high ISO values. Generally speaking, you still want to avoid the highest ISO settings on most cameras.
In this photo shoot I did with a couple of models, we were spraying water and I wanted to capture very high shutter speeds. It was late in the afternoon, and the only viable option was to take the ISO all the way up to 12,800! I rarely (actually never) shoot portraits at ISO 12,800 but I made an exception for this.
If digital noise becomes a problem, remember you can apply noise reduction using Adobe Lightroom or Photoshop, so the digital noise isn’t necessarily a deal killer at all. The bottom line is that your camera has those higher ISO capabilities for a reason. Use them if you have to, but ONLY if you have to!
Experiment with light when you create portraits. Especially take note of ways you can make the photograph more interesting by more dramatic use of light and shadow.
Sometimes you might even choose to place the main light (key light) in a position where it only adds light on a portion of a face, and allow other portions of the subject’s face and body to fall off into shadow. This is a more dramatic style of lighting that often leads to nice results. The viewer’s eye will be drawn to the light areas of the image. It might not really matter that other portions of the subject fade away in the shadows.
Also, due to a phenomenon called the “inverse square law” of light you can get a more dramatic falloff of the light by positioning the light closer to the subject. The inverse square law says that the light drops off in a very predictable way. Light decreases as in inverse of the square of the distance from the light source. If that doesn’t mean anything to you, just know the light drops off more quickly from one side of the subject to the other when the light is positioned closer to the subject.
Sometimes I am asked if an image was edited with Adobe Photoshop. My answer is almost always yes, at least to some degree. To be well-rounded in your photographic skills these days, it is important to sharpen your camera skills, management of light, AND editing your images on the computer.
I work with all of my images using Adobe Lightroom, and then for some of those images, I take them a step further and use Adobe Photoshop to enhance them. I also use a variety of great plugins from companies like Topaz Labs, Google Nik Software, Alien Skin Software, and others.
In this photograph, I’ll break down the main sections where I edited the image using various tools. My model’s name is Vanessa. She was absolutely wonderful to work with.
Here are the areas that were modified from the original image.
First I tweaked the overall image light levels just a little bit in Adobe Lightroom. My camera exposure settings were pretty much perfect already, so I didn’t have to adjust the image very much.
A. In these areas, I made some Photoshop edits. I added the fake ball of light using the Photoshop Filter->Render->Lens Flare option. Then there was a clothes pin holding the fabric that I had to remove with the Photoshop Clone Stamp tool and the Healing Brush.
B. I did a little smoothing of her skin using Nik Color Efex Pro‘s Dynamic Skin Softener Tool. Vanessa didn’t really need much smoothing because her complexion was already wonderful.
C. I used my Topaz Glow plugin from Topaz Labs just to enhance Vanessa’s hair and the fabric ever so slightly. I also used Topaz Glow to modify the ball of light to have a more unusual look.
D. I dropped in a different background using Photoshop Layers and Layer Masks, just to further mix things up and just to give the photo a bit different look from the original studio shot.
Here is the original photo, as shot in my studio (note the clothes pin)
😉
There are an infinite number of options for how you might edit any photograph. This is really a lot of fun, once you learn how to use Adobe Lightroom and Photoshop and explore some of the many plugins.
I encourage you to not get “stuck” in just one aspect of photography. Explore your creativity. Challenge yourself technically. Experiment with different lighting techniques. Improve your photo editing skills. Dare to liberate yourself to create art, not just photographs.
I went to the Houston Art Car Parade this past weekend. I brought all my DSLR camera gear with me to Houston but when I woke up Saturday morning, I decided I didn’t want to bother with carrying my camera. So, with a little hesitance, I left my DSLR behind and just took my iphone as my only camera. I just wanted to enjoy the event, and fully experience the vehicles rather than focusing all my attention on photographing the vehicles.
Sometimes “photographing an event” can be quite different from “experiencing an event.” I just wanted to experience it and have fun. (Maybe it is because I take so many photos that, for me, NOT taking photographs can be my chance to just enjoy and relax.)
Therefore, everything I post here are just my iphone snapshots. The purpose of the post is not about my photography of the event. Rather, I wanted to talk about the experience, and a few insights gained.
I 100% believe it is important for all artists to observe and explore various forms of art, not just “their” art. Photographers should study painting, sculpting, music, dance, etc. Take the time to SEE how other artists pursue the expression of their art.
One thing I also believe about photography is that we need to learn the technical stuff only to open the door to our creativity, but do NOT stay stuck in the technical stuff. You will find all sorts of websites that will tell you to buy they highest quality gear, cameras with the biggest number of megapixels etc. and they’ll obsess about the technical aspects as if that is what makes good art. While the tools you choose are indeed important, that is not the whole story. You can go out and by a super sharp $2000 lens and yes your photos may end up being a bit sharper, but that does not mean your images will necessarily any be better artistically.
I urge you to liberate yourself and think more broadly about your photography as ART, and open your mind and eyes to ways you might challenge yourself artistically to express your art in new and fun ways.
I will soon be offering a totally different type of photography class…
This class will help you photograph the world differently, with new eyes, and new means of expression, and challenge you to put into practice what you learn and discover in class and then come back and share your art with the group. Plus you will have a chance to see what the other artist/photographers came up with.
If you want to get better at photography, learn the technical fundamentals but absolutely do not stop there. That can get boring after a while! Also learn to be proficient at tools like Adobe Lightroom and Photoshop, but then take the next step! Challenge yourself artistically.
Let me know if you’d be interested in participating in this new class, and I will announce more details soon. You can contact me using my website contact form, or if you know my email address, just send me an email, or post a comment at the bottom of this blog post.
Now, back to the Art Car Parade…
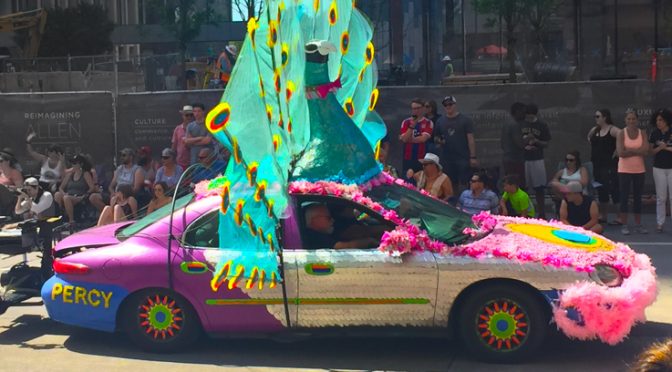
Here are some of my iphone snapshots from the art car parade. I loved the wild and crazy things people did to their cars, or their vision that went beyond just modifying a car, and instead create a whole new type of vehicle. It was a lot of fun, and I found myself inspired and entertained for several hours.
Could you imagine driving this through downtown Austin?
Some pretty wild designs:
This one, I really liked!
And then there was this van completely covered in old cameras.
Another wild vehicle.
What do you do if your hobby is model railroading, and you decide to enter the Art Car Parade? Mount your model railroad on top of your car, of course.
Yaba Daba Doo.
Must’ve used a LOT of glue for this.
Pretty cool.
I really liked this one. Car converted into a sardine can.
You guessed it, the driver was dressed as a sardine.
More fun wild stuff.
Yes, I LOVED this one. Extra credit for thinking outside the box. Or I guess he stayed in the box.
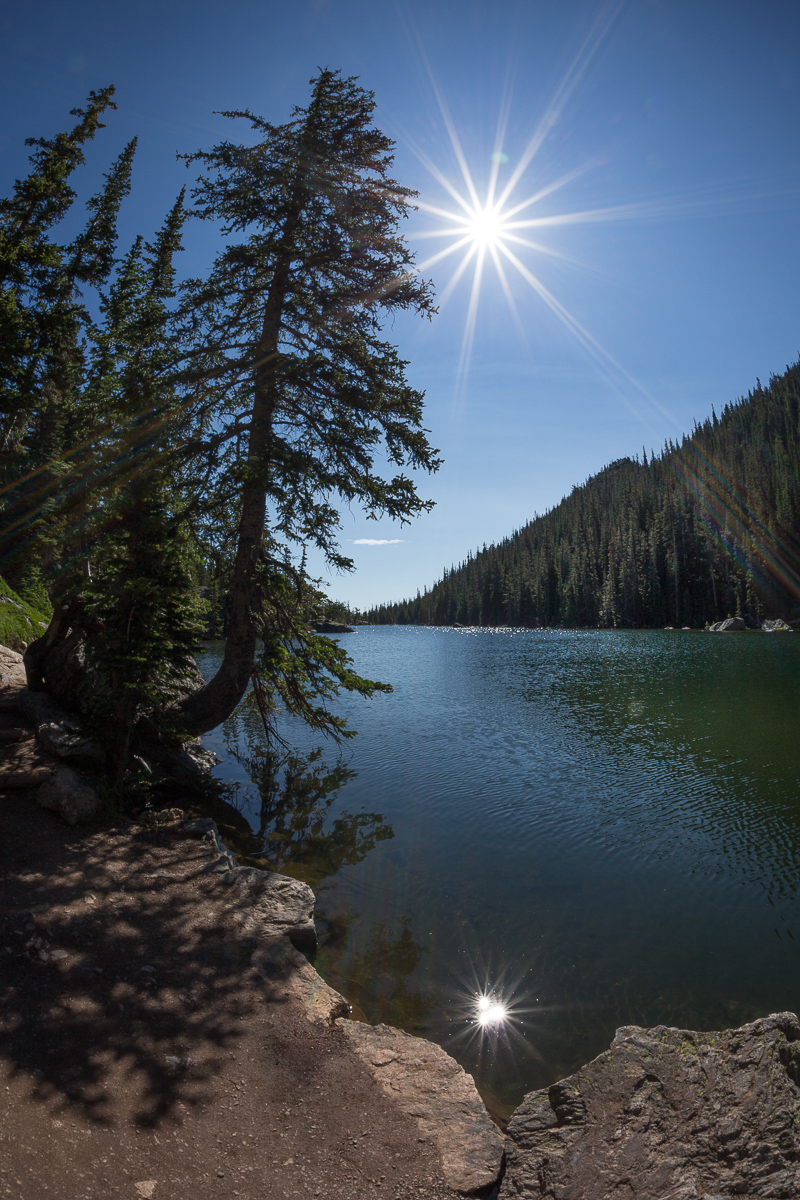
Here’s a quick tip for creating a “starburst” effect with your camera. Just stop down your aperture to a high f/number like f/16 or f/22 while photographing a scene that has a bright light like the sun, or streetlights at night. The result will be a starburst effect at each point source of light.
The exact characteristics of the starburst will depend on the blades that shape the aperture as well as the lens optics. So, the effect will be different on different lenses. I have found the starburst effect to be most dramatic on my Sigma 15mm Fisheye lens. Anyway, it’s sometimes fun to try this out. Here are a few shots at f/22. Note even the sun reflections in the water also reveal a starburst.
And then in the shot below, note the starburst effect is not as strong. This shot was taken at f/8.
The easiest way to set your camera to shoot a photograph at a high f/number is to choose Aperture Priority Exposure Mode (A on Nikon, Av on Canon) and simply dial the aperture to f/16 or f/22.
If you DON’T like or want that starburst effect, just pick a low f/number like f/2.8 or f/4 or f.5.6 instead!
Happy Picture Taking!
Kevin Gourley
Kevin Gourley Photography Workshops, Austin, TX – Austin Photography Classes