Tag Archives: photography

So You Think You’re Finished

I am a proponent for getting the shot right in the camera as much as possible.  Get the exposure right. Get the depth of field right. Get the shutter speed right. Get the lighting right. The result will be a better photograph!

That doesn’t mean your job is necessarily done after firing the shutter and capturing the image. So much of the fun of digital photography is the step that comes next. Granted it takes a bit of creativity and (even more-so) a mastery of the various software tools available. I highly encourage you to take the time to learn powerful tools like Adobe Photoshop and Lightroom. Explore the various plugins currently available. Push yourself to go beyond just taking the photograph. Use your digital editing skills to make art!

Since you can do so much with a digital photograph to edit and enhance it, or perhaps even totally change it, sometimes it is hard to say “I am finished with this photograph.” The more proficient you become with your photo editing skills,  you will discover new ways to edit your old photographs. You can even combine different photographs taken at different times with different cameras. 

Here are a few examples:

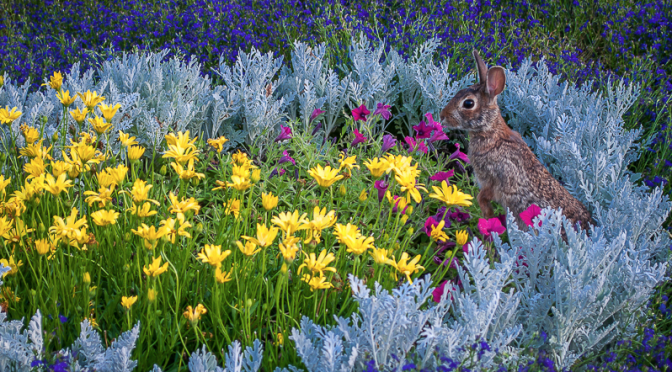
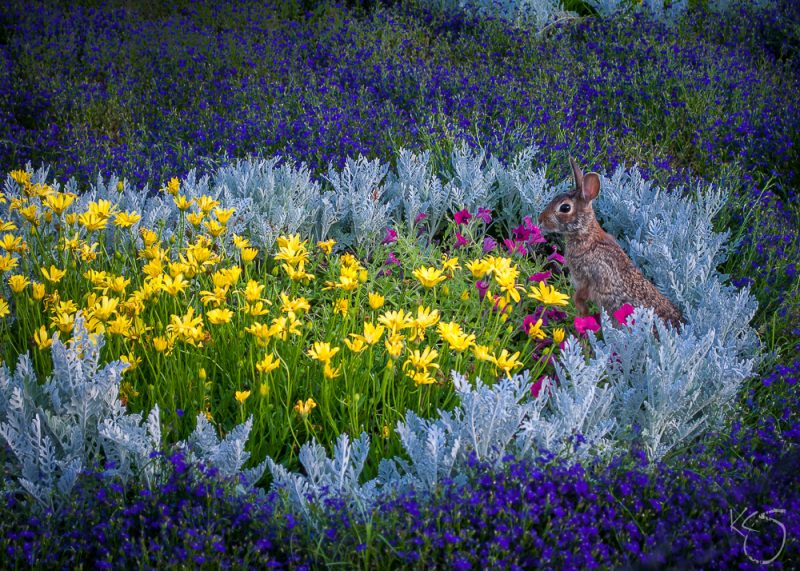
Here is an original image, as shot in-camera. It already is a good starting point. Nice dramatic light.  Nice composition.

The photo really is a good starting point.  I could just crop it a little bit, and it would be fine as-is.  But, when I was shopping recently, I noticed a placemat that looked interesting, so I took a photo of it with my iPhone:

Then, with a little Photoshop “magic”, using layers, layer masks, blend modes, etc., I replaced the background with the placemat, just darkened a bit.

photoshop. post processing, dramatic portrait

The point is, you can create all kinds of variations from an original image and it is a lot of fun just seeing what you can create.  Be creative. Open your mind to use most anything as a possible background.

Use the tools at your disposal, Lightroom, Photoshop, and various plugins to enhance images. Don’t be afraid to combine images shot with a DSLR with images that were shot with an iPhone.

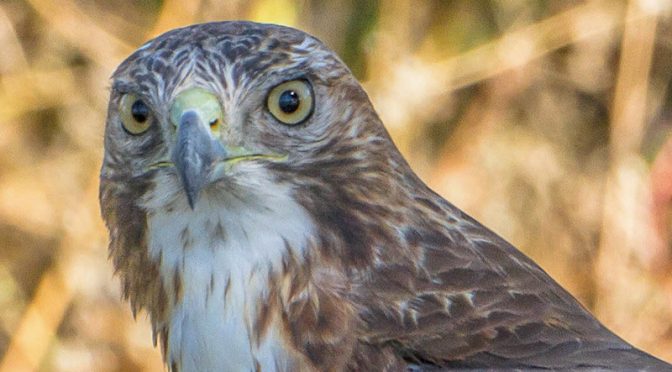
I created one other variation from the same original image. I cropped in much tighter and then used a plugin from Topaz Labs, called ‘Topaz Glow‘.  (At only $69.99, Topaz Glow is a great tool to have on hand.) Here are the results:

topaz labs, topaz glow, plugin, photoshop

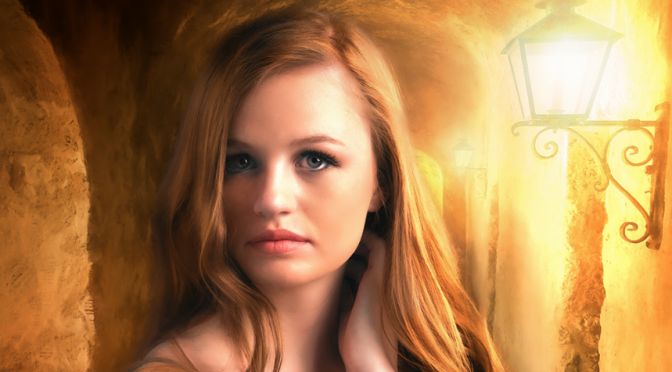
Or here is another example. In this case, I started with an image created in my studio during one of the Studio Lighting Workshops I teach. (Actually, ALL of these were shot by me while teaching a Studio Lighting Workshop.)

portrait, dramatic

I then went back through some old photographs I had taken years ago with a different camera while traveling through Austria and Germany. I found an image among those that would work well in merging the portrait above.

With a little Photoshop editing, blending, masking, etc., here is the result:

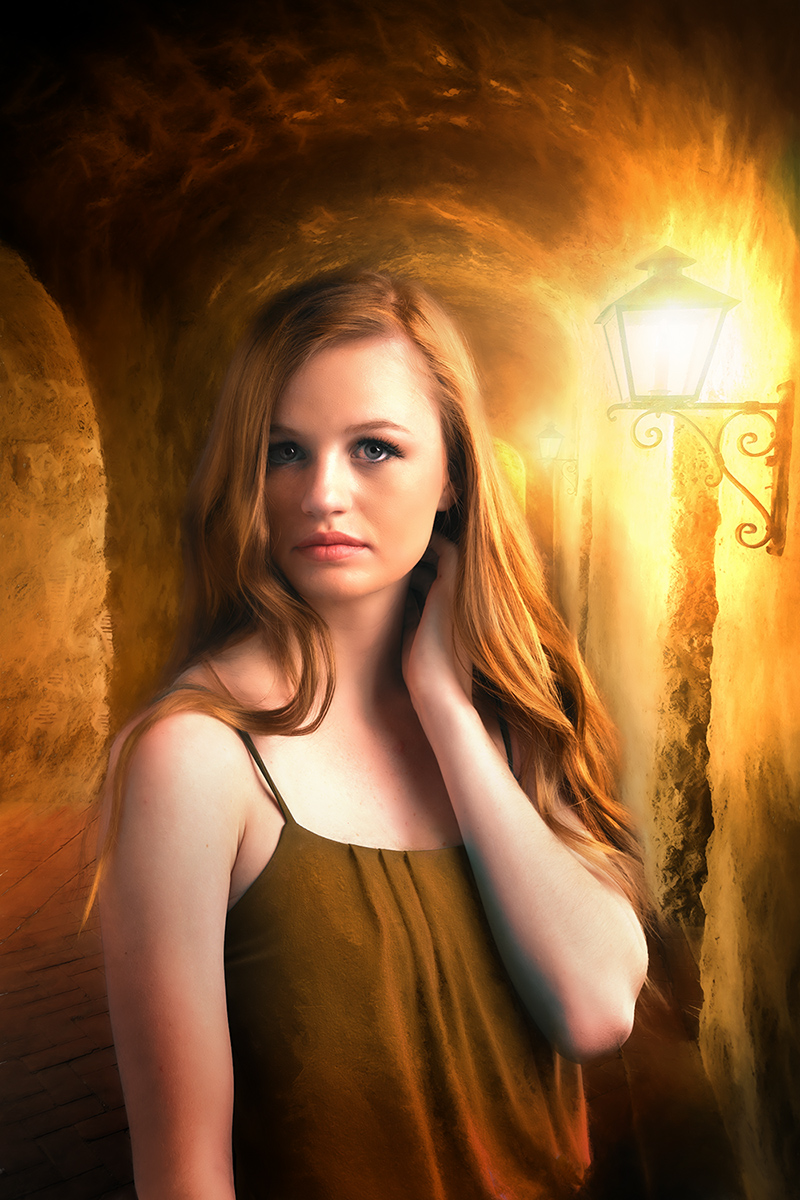
Here’s one more example. This image was also shot in my studio:

dramatic portrait

I then grabbed this image from one of the photos from my Austria/Germany travels:

Then I combined the two images:

dramatic portrait

Really, once you have taken the photograph, the fun has only just begun.

Here are some of the tools you should check out for photo management, editing, and enhancement:

  • Adobe Lightroom
  • Adobe Photoshop
  • Topaz Labs Software
    T
    hey make a wide range of products for image enhancement and excellent artistic effects. My students get 15% off Topaz Labs products!
  • Alien Skin Software
    They also make a wide range of products for image enhancement and excellent artistic effects. In fact, their Exposure X2 software might be an alternative for you to consider if you just don’t want to use Adobe Lightroom. My students get 10% off Alien Skin products!
  • Google Nik Collection
    A collection of great software for photo enhancement, and it is TOTALLY FREE! Available on Mac or PC.
  • Macphun Luminar
    A powerful photo editor.  Mac only. My students get 10% off.
  • If any of you are experimenting with HDR (High Dynamic Range) photography, make sure you check out:
    • Photomatix by HDRsoft
      Runs on Macs and PC’s. My students get %25 off their products.
    • AuroraHDR by Macphun
      Runs on Macs only. My students get 10% off their products.
  • SLIDESHOWS!
    One other alternative way to have fun with your images is to create a slide show!  Check out ProShow Producer by Photodex (for PC’s). Or ProShow Web which works on any platform.
  • Ready to make PRINTS from your great photographs?
    Check out Color Inc Pro Labs. They do excellent work, plus my students get special discounts!

Want to Learn More About Photo Editing (or Photography)?

I occasionally teach classes on Adobe Lightroom and Photoshop and many other topics. Make sure you are subscribed to my email list so you’ll be notified as I add more classes.

I also offer private instruction on almost all photographic topics. We could set up sessions where I just teach you what you need to know the most, to get you started.

Happy Picture Taking (and Editing)!

Kevin Gourley

Share

Featured Photographer: Mike Johanns

Your Name: Mike Johanns

Type of Camera: Canon EOS 5D Mark II

What do you love to photograph the most?
My first loves are landscapes & wildlife, but the list of photographic interests has grown considerably over the years.

What is one thing you have learned that has improved your photography?
I used to believe that mastering the technical aspects would take my photography to the next level, but addressing the artistic elements of photography is the key to transforming typical two-dimensional pictures into creative, evocative, multi-layered images.  

Advice you’d give to others wanting to grow in their photography skills:
Challenge yourself to experiment with different genres of photography to expand and hone your skills.  Last year I participated in a new genre – fine art nude photography.  I gained a new appreciation for light interacting with form, and that learning improved my portraiture.

Share

Featured Photographer: Stephanie Kopas

Your Name: Stephanie Kopas

Type of Camera: Nikon D3400

What do you love to photograph the most?
I love capturing nature in it’s rawest form (landscapes, astronomy, animals). It seems in this day and age things are constantly changing but I appreciate the ability to isolate a scene and see the world as it should be seen- if even for just that brief moment. 

What is one thing you have learned that has improved your photography?
Exposure compensation! It has saved many of my favorite photos to date. 

Advice you’d give to others wanting to grow in their photography skills:
Photography is a skill, not an ability. Start with the fundamentals and then practice, practice, practice. 

Share

Featured Photographer: Kim Stacey

Your Name: Kim Stacey

Type of Camera: Nikon D7100

What do you love to photograph the most?
My cats, flowers and wildlife

What is one thing you have learned that has improved your photography?
Slow down and be mindful of what you are doing. Watch my shutter speed and backgrounds.

Advice you’d give to others wanting to grow in their photography skills:
Don’t worry about what gear you have. Do the best with what you have. More stuff and better cameras don’t necessarily make better images.

Share

Featured Photographer: Beverly Heacker

Your Name: Beverly Heacker

Type of Camera: Canon EOS 6D

What do you love to photograph the most?
Birds and my grandchildren

What is one thing you have learned that has improved your photography?
Pay attention to what is in the background of the photos I’m taking.

Advice you’d give to others wanting to grow in their photography skills:
Take some classes from Kevin Gourley.  He is amazingly patient, kind, understanding, talented, and knowledgeable.  He also makes you feel comfortable and no question is a dumb one. He provides handouts and gives homework.  And his classes are fun.

Share

Image Stabilization = Sharper Images

All camera brands offer some form of image stabilization. The technology is wonderful! Whenever you are using slower shutter speeds while holding the camera, hand vibration will cause some amount of motion blur, making the image less sharp. In these situations, image stabilization can really help. Images that otherwise would turn out a little soft (unsharp) will be much sharper with image stabilization.

Every camera and lens manufacturer calls this technology something different, adding a little confusion. Canon calls it Image Stabilization. Nikon calls it Vibration Reduction. Sony calls it Super Steady Shot. Tamron calls it Vibration Compensation. It’s all basically the same idea.

The different manufacturers implement this feature in different ways. Some have it built into the camera body, and others build it into the lens. Canon and Nikon build it into their lenses. The catch is, not all lenses have this feature. Generally, lenses that have this feature cost a bit more than ones that do not. I personally believe it is worth the extra cost.

Usually the manufacturer will indicate the degree to which their stabilization will help. For example, they may say a lens offers “3 stops of image stabilization.” To know what is meant by that, you have to consider a basic rule about what shutter speed is sufficiently fast to freeze any motion blur introduced by hand movement/vibration.

That rule says the shutter speed should be at least 1 / focal length when using a camera with a “full frame” sensor. So if you are shooting with a 200mm lens, you should ensure the shutter speed is at least 1/200th second or faster. Or if you are not using a camera with a full frame sensor, such as a camera with an APS-C sensor, then you need to take into account the sensor “crop factor” (typically 1.5X on most Nikons and 1.6X on most Canons with APS-C sensors). That means with that same 200mm lens on a Canon Rebel DSLR with a 1.6X crop factor, is effectively producing images that look like they were shot with a 1.6 X 200mm lens (320mm) and you should really shoot at least 1/320th second or faster.

Now, back to that lens that says it offers “3 stops of image stabilization”. If you are shooting with a 200mm lens they mean you can break that shutter speed rule I mentioned above by three stops. A stop is a photography term referring to the doubling of the light. So, in terms of the shutter speed, “one stop” means making the shutter speed twice as slow, like going from 1/200th to 1/100th.

If you are using a 200mm lens on a full frame sensor camera, you should normally try to shoot at 1/200th second or faster. If the lens offers “one stop” of image stabilization, then you can get away with shooting at 1/100th. If it offers three stops of image stabilization, you can theoretically shoot at 1/25th second! (1/200th -> 1/100th -> 1/50th -> 1/25th). Wow!

Just note that it is probably risky to go that far with trusting the image stabilization to sharpen up a slow shutter speed shot, but it sure helps having that feature when you simply must use a slow shutter speed hand-held, like when shooting in a low light scenario. If it turns out the image stabilization just isn’t getting the job done well enough, that means it is time for you to shift to a higher ISO which will enable you to shoot at faster shutter speeds.

One more note about terminology you might encounter:  Sometimes you might see the term “EV” used instead of “stops.” They mean the same thing. “EV” stands for Exposure Value and technically is the more accurate term when talking about varying shutter speeds. A “stop” normally refers to the aperture values, but when we are talking about shifting shutter speeds by an amount that is the equivalent of adjusting the light by one f/stop, that is said to be an adjustment of one EV. Still, you will find many manufacturers talk about the image stabilization in terms of stops instead of EV’s. It’s all the same.

Also, note that lenses that offer image stabilization have an off/on switch, and some offer more than one mode of operation. Check the manual that came with your lens for more information about its features and any limitations. For example, the reason they have an off/on switch is because when you are shooting on a tripod, you should turn off the image stabilization.  Again, check your manual for more information about that.  Just remember to turn the image stabilization back ON when you are shooting hand-held!

This feature is so important; you really need to make sure you know how to use it!  Using this technology will help ensure you get consistently sharper hand-held shots! It’s a “must use” feature!

Image Stabilizer Example

Share

Featured Photographer: Bob Brandt

Your Name: Bob Brandt

Type of Camera: Canon EOS 6D

What do you love to photograph the most?
Creative Portraits

What is one thing you have learned that has improved your photography?
Studio lighting techniques.

Advice you’d give to others wanting to grow in their photography skills:
Never stop learning! There are so many classes you can take to advance your photography skills. Don’t stop taking them. I’ve taken many of Kevin’s classes and look forward to signing up for more!

Share

Featured Photographer: Kevin Gourley **NEW!

Hi!  I have added a new section to my blog called “Featured Photographers” where I will be featuring different students of my workshops and their work.  I am featuring myself first, just to demonstrate how this works.  Stay tuned for other photographers featured over time! 🙂

Your Name: Kevin Gourley

Type of Camera: Canon EOS 6D and 5D Mk II

What do you love to photograph the most?
I love all types of photography (nature, landscapes, portraiture, studio work, dramatic imagery), but what I am finding most fun these days is producing ‘composite’ images where I combine different images in Adobe Photoshop to creating a scene that never existed.  The image below is a composite from an image shot in studio with a daytime image at a mission in San Antonio shot with an iPhone and then turned into a night scene with more dramatic lighting.

What is one thing you have learned that has improved your photography?
Pay attention to the LIGHT. Better light = better photographs.

Advice you’d give to others wanting to grow in their photography skills:
Practice! Learn from others. Practice some more!
(Shameless plug: Take my classes! 😉  )

Share

My Top 6 Lessons Learned in Photography

I was thinking about the various things I have learned about photography over the years. What did I learn?  How did I learn it?

I thought it might be helpful to share some of my insights about my top 6 lessons learned. Most of these things I either learned from other instructors or sometimes from making horrible mistakes. I don’t recommend making horrible mistakes, but that is sure one way to learn a lesson. 😉

Lesson 1
Pay attention to what you are doing and get it right in camera.

This lesson was something I learned a long time ago (like 35 years ago)!  I think it was really beneficial that I started out in photography back in the days of film.  I shot many many rolls of Kodakchrome 64 slide film.

After I took a series of photographs, I had to send the film off to Kodak to be processed.  With slide film, the developed film is then cut into individual photographs that were placed in cardboard mounts and I would have to show the photos using a projector.  So the photograph I saw in the slide was the actual image I created in the camera.  Whether or not I properly exposed the photograph, I would see the results. There was no faking it.  If I did a bad job, my slide was ruined. I had to get it right.

The fact that the results were not immediate (because I had to have the film developed) meant that I really had to pay attention to what I was doing, otherwise I was wasting a lot of money.  As a student in college, I didn’t have much money, so I payed attention.  My meticulous attention to details (because I had to save money) made me a better photographer.

Even in this digital age, it is much better to get your photograph right in camera rather than just leaning on “fixing” the image after you took it. If you start with a well-exposed shot, you will always end up with a superior end result.

kodachrome

Lesson 2
Manage the shutter speed carefully.

Depending on the light available, ISO, and aperture you have chosen, you will end up with some shutter speed value. I learned this the hard way, but I learned it:  If I do not have the shutter speed fast enough, the photo will not be sharp because of hand vibration / movement.  The general rule of thumb for hand-held photography is to make sure the shutter speed is at least 1 / focal length (of the lens). If you are shooting with a 70-200mm zoom lens with it zoomed to 200mm, then make sure your shutter speed is at least 1/200th second. Technically that rule is for a full frame sensor camera. For a camera with an APS-C sensor, you should modify that rule to take into account the “crop factor” of your camera (usually 1.5 for Nikon and 1.6 for Canon).  A 200mm lens on a Canon Rebel would effectively be 200 x 1.6 = 300mm. So make sure the shutter speed is at least 1/300th second.

Many lenses these days (and some camera bodies) have image stabilization that allows you to break these rules a bit.  So the rule is approximate.

You also need to take into account the movement of the subject. If there is a lot of movement of the subject, you may need to use a shutter speed even faster than the rule of 1 / focal length.

Lesson 3
Manage the depth of field.

You are in control of the depth of field through your choice of aperture. The depth of field is the range that appears to be sharp in front of and behind where you focused.  Choose carefully depending on whether you want a deep or shallow depth of field.  A low f/number yields a shallow depth of field. A high f/number yields a deep depth of field. This is something you should think about in every shot you take because you are in control. Don’t let the camera decide for you. It is just a machine. It has no idea what you want unless you tell it, by controlling the aperture.

Lesson 4
Change your perspective.

Sometimes it is good to just stop looking at the world the same way you always see it. Change your position and angle. Mix it up a bit. Look up.  Look down. Look behind you. Raise your camera way up high. Put it down on the ground. Sometimes that change in perspective will lead to a shot you would have missed.

Lesson 5
Light is ultra important.

Pay attention to details about the qualities of light including angle, direction, number of light sources, light ratio, diffusion, reflection, shadows, etc. A photograph is created by light. It is the most important ingredient in any photograph. Better light leads to better photographs. Master lighting techniques and I can guarantee your photographs will improve. That is true whether you are in control of the light using flashes/speedlights or shooting with natural light. You can’t really control the light in nature, but you can come back to a location at a different time of day or time of year and the light will be different.

Lesson 6
Practice, practice, practice.

There is no substitute for practice.  Keep taking pictures.  Assess the results. Make mistakes and learn from them. Just keep shooting. The more you do it, the better you’ll get. Take classes. Learn more. Do more and your photographs will improve. As Henri Cartier-Bresson said, “Your first 10,000 photographs are your worst.”

Yes, there is more to it…

I could keep going, but this is all for now.  Post processing your images (editing on the computer) is also quite important to add the finishing touches to take your photos from “good” to “great,” but it all starts with what you do with your camera. Get that right first.

Happy Picture Taking,
Kevin Gourley

Share