Featured Photographer: Bill Alvarez

In our Featured Photographer series, we highlight the work of our former and current students!

Your Name: Bill Alvarez

Type of Camera: Pentax K-1 and Pentax K-3

What do you love to photograph the most?
Landscapes and Industrial Devices \ Machines

What is one thing you have learned that has improved your photography?   Learn the ISO limits of your camera and don’t be afraid to bump up your ISO to increase shutter speed (A slightly noisy picture in focus is better than a noiseless blurry picture.) and invest in good lenses.

Advice you’d give to others wanting to grow in their photography skills:  Experiment and learn to use all the tools at your disposal in you photographer’s tool box. With practice and experience it will become more natural to envision and execute on your photographic ideas.

Share

Light Metering – Incidental vs Reflected

I often get questions about light metering, and the confusion between “incidental” and “reflected” light metering.  I was responding just this morning to a question via email and thought I’d go ahead and include my answer here as well, in case this might help any of you!


Reflected Light Meter:   Measures reflected light.  This means you point the meter at the scene being photographed.   This measures the brightness of the scene you are looking at, and comes up with exposure values so that the photograph created will be the right brightness.  Unfortunately, this approach does not know whether the scene is a black wall or a field of snow.  The reflected light meter just makes an assumption about how bright the resulting elements in the photograph typically should be, often in some middle gray value because that is generally true, though not always true.  Many sources say Ansel Adams came up with the 18% gray as being the perceived brightness of a middle gray value.  This is somewhat subjective, but that became the (approximate) standard.  The problem with that approach is that the meter has absolutely no idea how bright the photo should ACTUALLY be, so it just assumes most of the time, the main elements of the photograph are somewhere in the middle gray range, not white, not black. The meter therefore assumes the point of reference of 18% gray is the right brightness for the photograph.  Since it is calibrated based on that assumption, it provides shutter speed and aperture value recommendations so that the thing being metered turns out to be mid gray. So, if you are metering off a target that is 18% gray, then the meter will give you a pretty accurate exposure setting so that the gray target turns out gray, and everything else in the photo that is not gray but is in the same light will turn out to be the right brightness as well, white will be white, black will be black, gray will be gray, as long as you meter off the thing that is gray.  That is where the camera’s different “Metering Modes” come into play, because you can control where the camera meters on elements in the scene since that is critical for reflected light metering.  This is also why cameras have settings like “Exposure Compensation” to allow you to adjust when the camera’s reflected light metering gets the answer wrong.   Also electronic flash (Speedlight) TTL metering is based on reflected light metering, therefore handheld incidental light metering is not involved in TTL flash photography.


Incidental Light Meter:  Measures light shining on the subject.  This means you point the meter at the light source.  With this type of meter, the color of the subject in the photograph is not relevant.  The subject can be white, gray, black, anything.  The basis for the measurement is only determined by how much light is needed by the sensor or film and that is solely determined by the ISO value. The ISO value determines the quantity of light needed.  The incidental light meter measures the light and determines how much light should be allowed on the sensor through controlling the aperture and shutter speed.   This is a very accurate approach.   It ensures white turns out white, gray turns out gray, and black turns out black.  Ultimately, the proper exposure for a photo is based on two things:  1) The amount of light required by the sensor which is determined by the ISO, and 2) the amount of light shining on the subject.  A gray card is not even relevant with an incidental light meter, since it is not involved in determining the exposure.  Only the light shining on the subject and the ISO matters.

No Meter:   Since an accurate exposure is actually based on the amount of light shining on the subject and the ISO, you can even determine an accurate setting without a meter.   If the light shining on the subject is direct sunlight, you can set the aperture to f/16 and the shutter speed to 1/ISO and obtain a correct exposure without any meter involved at all  This is often called the “Sunny 16 Rule.”

Hope this helps!
Kevin Gourley
Share

Featured Photographer: Scott McGill

In our Featured Photographer series, we highlight the work of our former and current students!

Your Name: Scott McGill

Type of Camera: Canon EOS 30D

What do you love to photograph the most?
That magic moment when something spontaneous happens, and you are able to capture it.

What is one thing you have learned that has improved your photography?   Getting closer to my subject.

Advice you’d give to others wanting to grow in their photography skills:  Carry your camera always.

Share

Using Adobe Lightroom to Edit a Nature / Landscape Scene

Hi friends!

Here’s a short video demonstrating the use of Adobe Lightroom CC to do some quick enhancements of a nature / landscape scene.

Also, I am considering adding another Adobe Lightroom Workshop at my studio in NW Austin on August 28, 29, 30, 31 2017 9am-Noon each day.  The price is $349 for 12 hours of very hands on instruction in a small group setting, teaching the use of Adobe Lightroom.

If you would like me to add the course, please let me know ASAP!   Click Here to let me know!

Now, here’s that video I was talking about:

Share

A Few Lightroom Edit Examples

We just got back from our Summer Rocky Mountain Photography Workshop!   What a great experience. We had a lot of fun as we went out photographing mountain scenics, waterfalls, wildlife, wildflowers, and sunrises, etc.

I thought I’d post this short video to demonstrate a few post-processing examples using Adobe Lightroom.  If you don’t know what “post processing” means, it just refers to what you do with your photograph AFTER you take the photo. It includes the editing you might do on your computer to improve your photograph.

For this example, I intentionally picked one of the more hazy shots rather than one of my “good shots”, just to demonstrate that you can do a LOT to enhance your photographs in Lightroom. Even if you have a photo that you might have quickly skipped over upon initial review of your shots, you might still find it has potential to be made “better” with just a few simple edits in Lightroom.

Note that all of my photographs were shot in “RAW” mode. Therefore the photographs will initially appear in Lightroom as minimally processed/enhanced images. That is because you are supposed to use Lightroom’s many features to enhance the photo. That is entirely different than when you are shooting in JPG mode. When you shoot in JPG mode, your camera might do all kinds of things to enhance the photo in-camera, especially if you are using options such as the “Landscape” Picture Style (Canon) or Picture Control Setting (Nikon), which dramatically enhances the colors.  With RAW mode, your image file will have substantially more color and brightness information embedded within the file but you are expected to use Lightroom (or other RAW processing program) to make the adjustments and enhancements using software to bring out those colors, enhance shadow details, make white balance adjustments, tone down highlights, etc.

Anyway… on to the video.  I chose an unremarkable shot and demonstrate some Lightroom enhancements to improve the shot.  I hope this helps you!

(Remember you can click on the little link in the lower right corner of the video to bring it up full-screen.)


We’ll be announcing our 2018 Rocky Mountain Photography Workshops very soon!  Our 2017 workshops are totally sold out.  You can click here to learn more about these workshops.

Share

2017 Rocky Mountain Summer Photography Workshop

The 2017 Rocky Mountain Summer Photography Workshop is under way!   We have had a great time so far.  Our first group has finished and it is time for our second group to arrive.  I have been so busy, I haven’t had much time to go through all of my images yet, but here area  few.  We  have experienced sunrises, wildlife including moose, elk, marmots, squirrels, chipmunks, mountain scenics, waterfalls, cascades, wildflowers, butterflies, hiking trails, and so much more. We also had a couple of wildlife visits right at our lodge, including elk and bear.

A Note About Making Backups: I also had a frustrating afternoon that is worth mentioning.  The USB drive where I load all my photos failed.  It appears to have a corrupted file system and shuts down randomly. Now that WOULD be a disaster if that was the only place where I put my photos.  My standard workflow includes downloading the photos from my memory card to my photo hard drive, and then backing the photos up to a 2nd hard drive, and only then deleting the photos off the memory card ready to take more photos. So, when my photo drive died, I was able to switch over to my backup drive and all was fine. If I had not been diligently backing up my photos each day, I would have lost all of my photographs taken during this workshop. Fortunately, all is good, and I have yet another drive that I am using as my new backup drive.  Keep this incident in mind as you do your photography.  If you don’t make backups frequently, you are living dangerously.  And cloud backup strategies are often useless while traveling because many locales have wifi that simply is not fast enough to support uploading many gigabytes worth of photographs.

We’d love to have you join us in 2018!  If you would like to join us in 2018 (since 2017 Summer and Fall are SOLD OUT), go to our 2017 web page and click on the bright green box to express your interest in joining us.  You’ll love this photographic adventure!  Those who express interest before the dates are announced will be given the first chance to register.

Here are a few photos from our travels.   Again, I really haven’t had much time to go over all my photos yet.

We host two groups in the Summer.  Here is our wonderful Group A:

Wildflowers are abundant in the Summer:

The “never summer mountain range” in July. I guess you see why they are called that.

Here’s Long’s Peak.

Early morning at the Alpine Visitor Center:

Elk:

Moose:

Waterfalls/Cascades: 

Marmots:

More waterfalls:

Lakes:

Sun and tree near Dream Lake:

Moon in early morning at Rainbow Curve:

A new day begins in Rocky Mountain National Park:

Here is how tourists photograph the park. 🙂


Duck on Lily Lake:

Bull Moose encounter:

Yes, he walked right in front of my vehicle:

Our burger cookout on Fall River:

Share

Journey to Colorado for Our Rocky Mountain Photography Workshops

I drive up to Colorado from Austin, Texas each year for our Summer and Fall Rocky Mountain Photography Workshops.   We bring so much equipment with us (including a laser printer, maps, manuals, camera gear, tools, and much more) it just doesn’t make sense to fly. I have come to really enjoy the drive.

Of course there is a lot of the drive that is just across flat land, but I enjoy the journey.  Right before you get to Amarillo, there is Palo Duro Canyon.  It’s a bit of a surprise since you are just in the middle of flat land and then suddenly there’s a canyon!

Once you are in Amarillo, you can check out the “Cadillac Ranch.”  Seems only logical to plant some Cadillacs face down in the dirt, I guess?

And then there is The Big Texan Steak House. If you can eat their 72 ounce steak with all the fixin’s withing an hour, you get it for free.  No I haven’t tried it. 😉  I do go there and eat a much-smaller-than-72-ounce steak, though.

In the panhandle of Texas, you’ll find a lot of small towns along the drive that are dying with numerous old gas stations long out-of-business with stories of travelers from decades past.

You’ll probably see a few trains passing by.  LONG trains.

Then there is Mount Capulin in New Mexico.  This dormant volcano has a perfect cone and you can drive to the top and hike around the rim.  It is so peaceful up there on top! You can see for miles.

Colorado Springs has so many places to visit such as the wonderful Garden of the Gods. We stop off at their gift shop and grab a bite to eat in their cafe on almost every trip.

Eventually, we get to our destination in Estes Park, Colorado for our Rocky Mountain Photography Workshops.   I’ll post more about the workshops in my next blog post.  We are sold out for 2017, but we are soon going to announce our 2018 workshop dates.

If you are interested in joining us in 2018, go to our 2017 page and click on the bright green box to express your interest.  You will be notified before the general public and be given the first chance to register!

Share

Photographing Fireworks

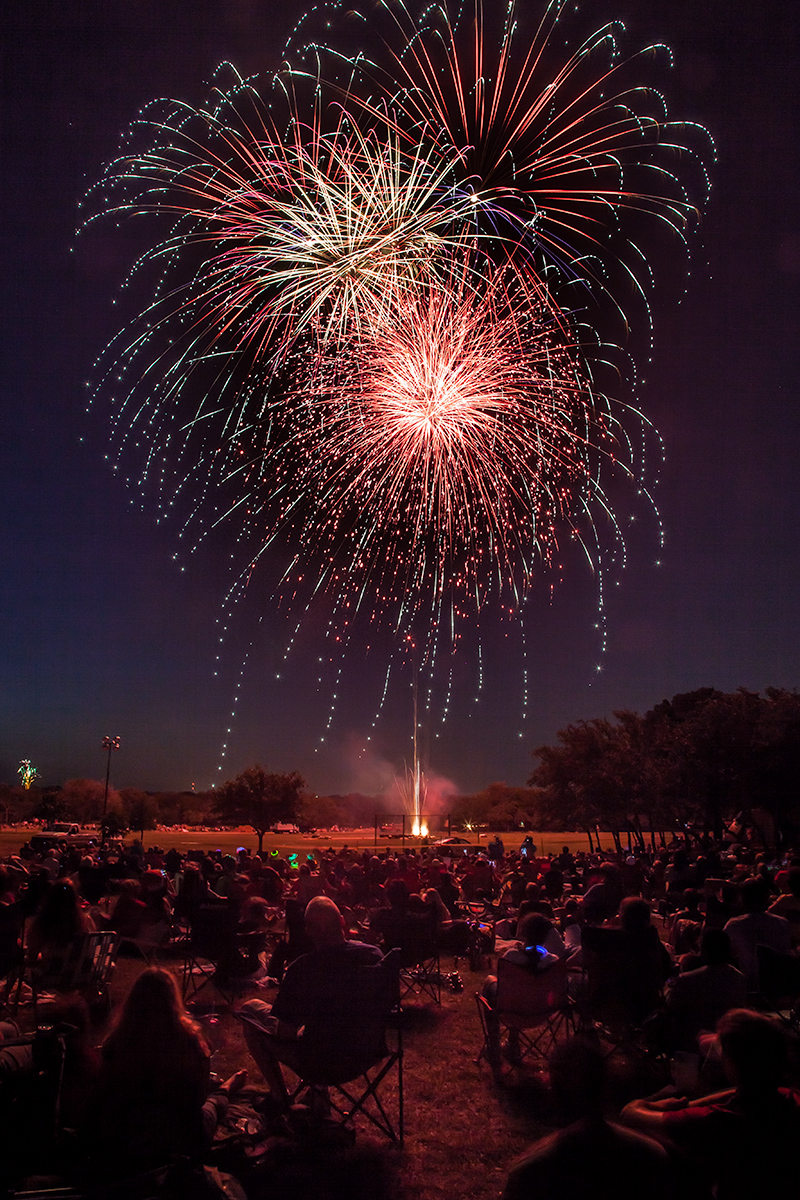
Hey gang!  I love photographing fireworks! I thought I’d share a few tips that will help you get better fireworks photos.

The two most important rules are:

  1. Be safe
    If you are working with your own fireworks, safety is of utmost importance. You sure don’t want to spend your evening in the emergency room, or watching a firetruck putting out the fire on your roof.  I am sure you know this already. 🙂
  2. Have fun
    Photographing fireworks is a lot of fun. I just had to list this as the #2 important rule because safety simply has to come first!

Reminder: Independence Day Special Offer!
Register for my Photography 101 Workshop by July 4th,
and SAVE $50!

Ok, Now Do I Need to State the Obvious?

Well I guess I’d better.  Make sure your memory card has plenty of room for the photographs you are going to take, and make sure your battery is fully charged.  The last thing you want to have to mess with is fumbling around in the dark in your camera bag for a spare battery or memory card once the fireworks show is under way!  You DO have a spare battery and memory card, don’t you?? 😉

Think About Placement Ahead of Time

When you are going to photograph a fireworks show, think about the location you are choosing for doing the photography.

    • Think about where the fireworks will go off
    • What’s framing your photos?
    • Pay attention to any distracting lights (streetlight?) that might be in the photos once nightfall arrives
    • Pay attention to distractions along the horizon
    • Think about how horizontal / vertical oriented shots will look at that location
    • Remember, shooting into an Eastern sky will generally be darker than shooting into a Western sky since fireworks shows typically start right after sunset.
    • Once you have lots of people there to watch the show, will there be people in front of you possibly blocking your view?
    • Which way is the wind blowing?  For example will the wind blow the fireworks smoke toward you?  If so, that means you will be photographing through the smoke!  Think about that when setting up.
    • The first fireworks have less smoke, but it might become more of an issue the longer the fireworks show goes on, and depending on your vantage point and wind speed.

Use a Tripod

You simply must use a tripod when photographing fireworks! Use a good stable tripod that is not at all wobbly, and make sure you do not touch or bump the tripod while you are photographing.  If you do, there will be a wobble in the fireworks streaks.

You might be enjoying the music of John Philip Sousa, but whatever you do, don’t start tapping your feet on the leg of the tripod while listening to “The Stars and Stripes Forever” as you photograph the fireworks!!  😉

Also, if you happen to be shooting from a wooden deck, be careful!! If your tripod is on a wooden deck, every little vibration will get transferred to the tripod, then to the camera, and it will cause little “wiggles” in the streaking lights in the photos.

A Flashlight Comes in Handy

Having a small flashlight or even the flashlight on a smart phone can be really handy so you can see the buttons on your camera.

Camera Settings

Most fireworks photography involves using time exposures with your camera mounted on a tripod.  Here are the general settings you can use.

  • Tripod: Like I said above, make sure the camera is on a tripod!
  • Exposure Mode: Use Manual Exposure Mode
  • Focus: Switch the lens to Manual Focus and focus the lens on infinity (and double-check this often, because it is easy to bump your lens focus ring and get the shot out of focus). Auto focus simply will NOT work for fireworks photography!
  • Lens Focal Length:  I find most of my shots are in the 24mm to 100mm focal length range (on a full frame sensor camera).
    • If you have a camera with a smaller sensor, for example an APS-C sensor, take into account your sensor’s “crop factor”.
    • If you don’t know what any of that means, just shoot more wider-angle shots, and judge how much you zoom in based on the shots you are getting.  Try some telephoto (“zoomed in”) shots also!
    • Make sure you take into account leaving enough room for high-rising fireworks.
  • ISO: Stick with your lowest ISO settings like 100 or 200
  • Aperture:  I have found most fireworks photos work well with an Aperture value set to between f/8 and f/22.
    • The more you open the aperture (lower f/number) the brighter the fireworks are
    • The more you close down the aperture (higher f/number) the darker and richer the colors are in the fireworks
  • Shutter Speed:  Usually 2.5 – 20 seconds is fine
    • Or you could use Bulb Mode to indefinitely open the shutter while the shutter released button is pressed.  I tend to prefer just picking a shutter speed.
    • What is different from normal photography is how the shutter speed affects the fireworks photographs.  Normally, if you open the shutter for longer times, the image gets brighter.  It is different when you are photographing moving streaks of light.
      • Slower shutter speeds cause the streaks of light to be longer
      • Faster shutter speeds cause the streaks of light to be shorter
  • Triggering the Shutter:  Exercise caution in causing any wobble from pressing the shutter release button because that wobble will be recorded in the photograph as the streaks of light will be wiggled.  You can avoid this by:
    • Use a remote shutter release (wireless or wired), OR you can
    • Set the camera shutter on a 2 second delay. That way you can press the shutter release button and then take your hands OFF the camera until it has finished taking the photograph.
  • Long Exposure Noise Reduction: Your camera has a feature called Long Exposure Noise Reduction.  While it IS useful for reducing digital “noise” (graininess) in longer exposure shots, it can be a bit frustrating when photographing fireworks.  The camera will do its long exposure noise reduction process in proportion to the length of time of the photograph. So, if you take a 20 second photograph, once the exposure is complete, it will take another 20 seconds to do the noise reduction.  That means your camera is busy doing image processing and is not available to take another photograph until it is done. Since fireworks shows only last for a short period of time, you might consider turning off the Long Exposure Noise Reduction and just apply noise reduction on your computer (for example in Adobe Lightroom).
  • Pay attention to the results you are getting and make adjustments as needed!  If the photos are too bright, close down the aperture (higher f/number).  If you want the streaks of light to be longer, shift to slower shutter speeds.

Note how changing the aperture value changes the brightness of the fireworks, but the lengths of the streaks of light are about the same because the shutter speeds are the same:

fireworks photography


Note how changing the shutter speed changes the lengths of the streaks of light:

fireworks photography


fireworks photography

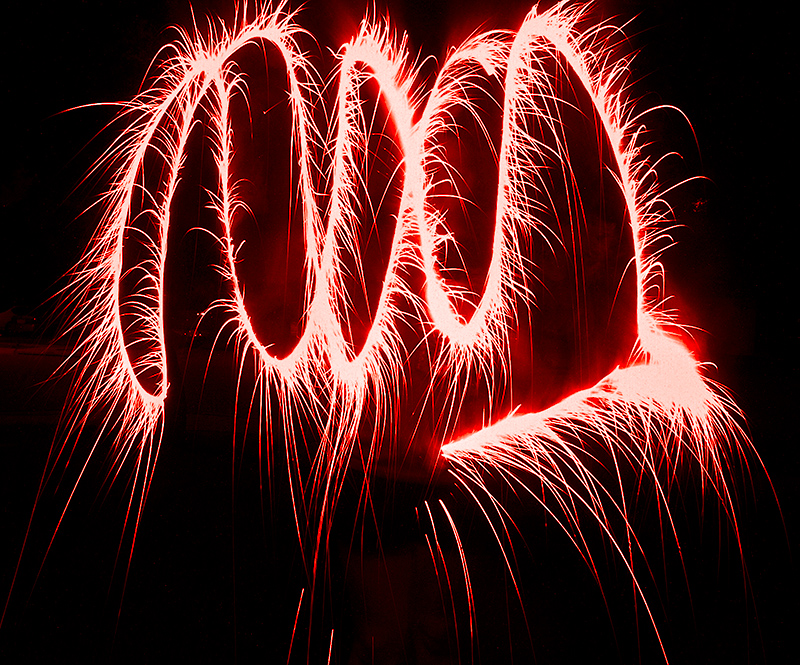
One more fun thing you can try is Light Painting!

With your camera on a tripod and the shutter speed set to 30 seconds, go out in front of the camera and swirl around sparklers and play with “light painting.”  It is so much fun!

fireworks light painting

Now, go out there and have fun!  And remember, BE SAFE!

Kevin Gourley


© Kevin Gourley Photography, Austin, TX

Share

Rocky Mountain Photography Adventure 2018

Our 2017 Rocky Mountain Workshops are SOLD OUT but we are considering dates for our 2018 adventures.  If you are thinking about joining us, go to our 2017 Rocky Mountain Workshop web page and click on the bright green button to let us know you are interested!   Everyone who does this will be given an opportunity to register for the 2018 workshops before we announce them to the general public!

CLICK HERE and look for the green button!

Student Comments:

  • “The natural beauty of RMNP was enhanced by Kevin’s knowledge of the park and locations that were custom picked for great photographic shots. Kevin’s calm, patient and knowledgeable teaching style meant that everyone, at whatever level they were at, felt comfortable asking questions, making mistakes, learning from them and then getting immeasurably better pictures as a result. The improvement in my photography from Day 1 to Day 4 was unbelievable. I came thinking the auto settings on my camera really took better pictures than I did, and I left seeing and believing that the pictures I now understood how to take were vastly superior to anything the camera could capture in auto mode. It was a 5 star experience from beginning to end.
  • “This is a workshop you can’t afford to miss! I came to the workshop with a goal of never using Auto settings again… I achieved that and more. Kevin is such a great teacher and is able to work with photographers of all levels. He made everyone comfortable, I am from Virginia and did not know anyone in the group (as were several others) by the end of the work shop I had made a group of new friends! We were able to get so many landscape and wildlife pictures. The whole experience was amazing. I’m ready to sign up for the next workshop! Thank you Kevin” – Barb
  • “The Rocky Mountain Summer Photography Workshop was an amazing experience! The success of the workshop begins with the organization and preparation of the instructor. Kevin and Gail were superbly organized and prepared! It was a treat to be lead to the best spots at the optimum time of the day to photograph the spectacular beauty and wildlife in the park. They demonstrated great flexibility and adaptability in meeting the needs of the group with the ever changing clouds, weather, and wildlife. It was also an incredible learning experience having a photography professional available to coach and instruct on the best methods for creatively composing a scene, capturing stunning images, and the correct use of a wide range of photographic equipment. Not only can I wholeheartedly recommend this workshop, but I’m already scheduled for a Rocky Mountain Fall Photography Workshop with Kevin!”
Share

Kevin Gourley Photography Workshops, Austin, TX – Austin Photography Classes